Elden Ring DLC: Blackgaol Knight’s Weaknesses and How to Beat Shadow of the Erdtree’s Biggest Troll
If you are really determined to beat the Blackgaol Knight in Shadow of the Erdtree, here is how you do it.
While Elden Ring: Shadow of the Erdtree offers you the freedom to go almost anywhere right away, many players find themselves quickly facing off against the Blackgaol Knight soon after they start the DLC. For many players, that will be very, very bad news.
If you do happen to find yourself facing off against this boss and are determined to beat him as soon as possible, then here is how you do it.
Where To Find Blackgaol Knight
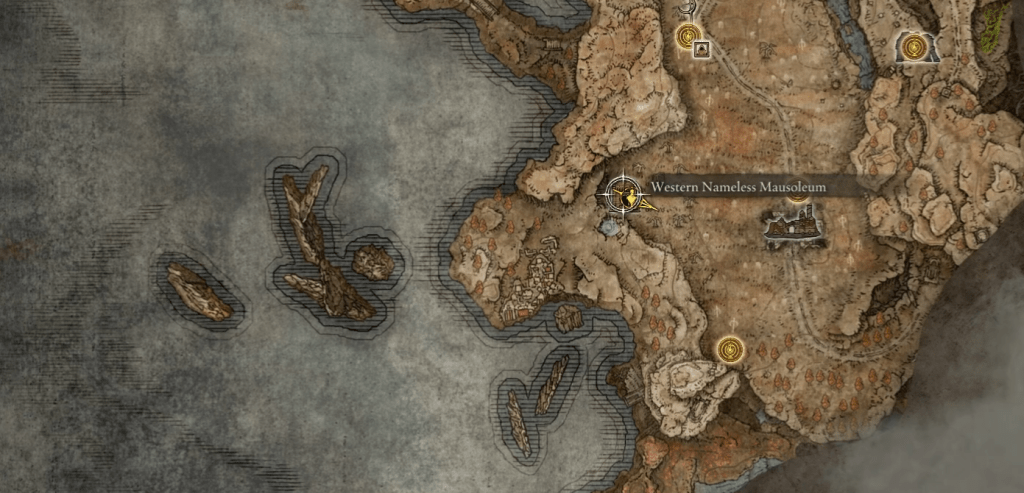
The Blackgaol Knight can be found in the Western Nameless Mausoleum dungeon just Northwest of where you start Shadow of the Erdtree. You’ll find that dungeon on the map right here:
While this is likely one of the first bosses most players will encounter in the DLC, please note that it is a huge “troll” fight. Much like the Tree Sentinel in Elden Ring, the Blackgaol Knight can be encountered long before most players will likely be able to beat him. If you can beat him early, though, you’ll find that he drops one of the most powerful weapons at this point in the game. However, you will likely have to acquire a few pieces of DLC gear and some DLC-specific stat upgrades before you can expect to survive this fight much less beat the knight.
If, however, you’d very much like to acquire one of the best early weapons in Shadow of the Erdtree as quickly as you can…well, here is what you need to know.
Blackgaol Knight’s Primary Attacks
The Blackgaol Knight primarily relies on these major attacks
- He’ll open the fight by unleashing a machine gun barrage of flaming arrows. He will return to this attack when he has the distance and time to do so during the fight (especially if you’re backing off to try to use a flask). You can dodge these by running in a semi-circle, or you may be able to stagger him during this attack animation if you have a quick strike ability available to you.
- The Blackgaol Knight relies on two kinds of overhead attacks. The first generates a magical slash that he launches in front of him towards you and can be identified by the brief “charging” animation that proceeds it. The second is a more straightforward overhead attack with less range but plenty of power. It is preceded by a similar wind-up animation that lacks the magical glow of the previous ability. In either case, it’s best to roll to the side to avoid these strikes.
- He’ll also regularly use a powerful jumping attack that is telegraphed by his “kneeling” animation. He can quickly close ground with this, but it’s also used to punish you for getting too close.
- If he staggers you during the fight, he will unleash a kind of charge attack that will most likely kill you if you are at or below 50% health. This finishing move is difficult to avoid and is a big part of the reason this fight is so tough.
- The knight will also use a series of three quick melee strikes designed to catch you off guard. He typically ends this attack pattern with an overhead strike that can easily finish you off if you get hit by any of the preceding combo strikes
- I’ve also seen the knight perform another charging attack that is similar to his stagger strike but can be utilized at any time. It’s usually preceded by the knight performing a quick turning animation.
- Like many other enemies, the knight will usually heal himself when he gets to around half health. It only happens once, but it’s difficult to avoid unless you are over-leveled and well into the DLC.
Knowing those attacks can be helpful, but what’s far more important is respecting the power of the Blackgaol Knight’s individual strikes. I took him on with a 99 Vigor character decked out in heavier armor, and some of those attacks easily depleted a third of my health or more. The Blackgaol Knight is quick, but it’s the individual power of his quick attacks that makes this fight an absolute nightmare. If you’re trying to fight him early, you can not expect to eat more than one or two hits at the very most before you’re in danger or dead.
Blackgaol Knight Weaknesses
The Blackgoal Knight has no known weaknesses to any of the primary status ailments in Elden Ring. That is to say that he seems to be incredibly resistant to Bleed, Poison, Rot, Frost, and most of the other imbuements that magically enhanced melee users (and other builds) typically rely on.
To make matters worse, you can not currently summon a Spirit Ash to help you in this fight. Among other things, that means you can’t employ any of the Mimic Tear cheese tactics in your strategy arsenal. That is very, very bad news for many fresh players.
The only notable weakness you may be able to exploit is Blackgoal Knight’s susceptibility to interruptions and other disruptive abilities that trigger stagger effects. That includes magical abilities that are capable of breaking stances. On that note, the Blackgaol Knight doesn’t appear to be especially resistant to magical attacks (even if he isn’t necessarily weak to them), so spells like Rock Sling that can stagger even bosses are especially valuable.
Just know that magic users may not be able to rely entirely on incantations during this fight due to the boss’ speed, power, and ability to either deal damage at longer ranges (or quickly close the gap during fights). You may need to supplement your strategy with an intelligence-based melee weapon to deal consistent damage.
How to Beat Blackgaol Knight
The easiest way to beat the Blackgaol Knight is to fight him with a Strength-based build equipped with a heavy Poise-breaking weapon and, ideally, a shield.
Again, the only things that seem to bother the Blackgaol Knight are stagger effects. For instance, I went into the fight equipped with a Strength-focused Star Fist build and essentially cheesed the battle by performing a series of powerful jumping attacks that destroyed his Poise and kept him constantly off-balance.
However, you have to have a ton of Strength, a lot of Vigor, and the perfect gear/skills to pull that strategy off. I’m talking about 99 ratings in Strength and/or Vigor and this optimal Star Fist build (or something very similar). Even then, I had to perform a few timely backward rolls and usually take a drink after a hit or (at most) two hits. That means that you’ll need to wear the lightest armor possible that still offers ample protection.
A shield may be a better option for most. It not only helps you eat those arrow attacks if you need it to, but it can absorb some of those long-range Weapon Skill strikes he loves to unleash across the room. Combined with a Strength-based stagger strategy, that shield may help you survive those moments in between heavy attacks that are otherwise difficult to dodge or absorb.
Parries are also incredibly useful during this fight, but good luck pulling them off. If it’s been a while since you’ve worked on your Parry timing, you’re going to have a very difficult time perfecting them during this fast battle against such a powerful enemy. It’s a more than viable option if it sounds ideal to you, though.
If you’re relying on Dexterity-based weapons (like a dual-handed Bleed build), you’re ideally going to want to use weapons with Skills that allow you to occasionally create distance during the fight and still deal damage. Otherwise, jumping attacks and attacks that let you quickly close the gap and then exit the fray are incredibly valuable. Raw power is much better than speed in this fight, but if you just don’t have that kind of Strength (and don’t want to respec) you have to be able to pick your spots during those rare times when the boss is in a “pause” state after an attack animation.
Magic users will have a slightly harder time during this fight. While it’s true that this boss is more susceptible to magic than raw melee strikes and status ailments, that’s really just an “on-paper” statistic. The reality is that you will only be able to get off two or three quick casts at most before you need to get out of range of his attacks that will delete your health. I think a combination of Night Comet and Rock Sling may be your best bet, but you will need to be patient to pull that strategy off. Anything slower than those spells should be dead to you, and you will likely need to supplement your casts with melee strikes when possible.

Written by
Matthew Byrd is Games Editor at Den of Geek and an entertainment enthusiast living in Brooklyn. When he's not exploring the culture of video games, he's…